How to find the source of CLS issues on your website

According to a study by Google, about 53% of websites have a Cumulative Layout Shift (CLS) score of 0.25 or higher, which is considered to be a poor score. This means that a majority of websites are affected by layout shift issues.

CLS stands for Cumulative Layout Shift, and it is one of the core Web Vitals metrics used to measure the user experience on a website. Web Vitals are a set of metrics that Google and other search engines use to assess the quality of a web page’s user experience. They are important because they can impact a website’s search engine ranking and overall user satisfaction.

CLS measures how a web page’s content moves as it loads. A high CLS score can frustrate users by causing unexpected shifts in page elements. Fixing CLS and other Web Vitals metrics improves SEO and user experience, boosting retention and conversions. Layout shift issues result from element loading hierarchy, not loading speed, and can disrupt the user experience.

According to Nielsen Norman Group, layout shifts can increase the difficulty of reading text by 10% and clicking on links by 15%. Additionally, Akamai’s study revealed that layout shifts can result in a significant 20% reduction in conversion rates.

Layout shifts harm the user experience in situations such as when content is suddenly rearranged or buttons become inaccessible. To fix them, prioritize element loading for a smoother experience. Let’s explore some options to address layout shifts on a page so you can find a way to fix them.

#1. Find CLS on the Web Page Test tool

This method is a personal favorite for pinpointing the element responsible for layout shifts. It’s both straightforward and efficient in identifying these elements. Furthermore, the web page tool offers video snapshots to illustrate how the shifts impact the overall page experience.

  • Select web vitals from the drop-down and paste your webpage URL.
  • Select the device type based on where the CLS issue is prominent. 
  • Then run the test. (Typically, it takes only a couple of seconds)
  • When the test is complete, you will find the web vital outputs, and if you notice CLS being marked as RED and is more than 0.1, then click on that.
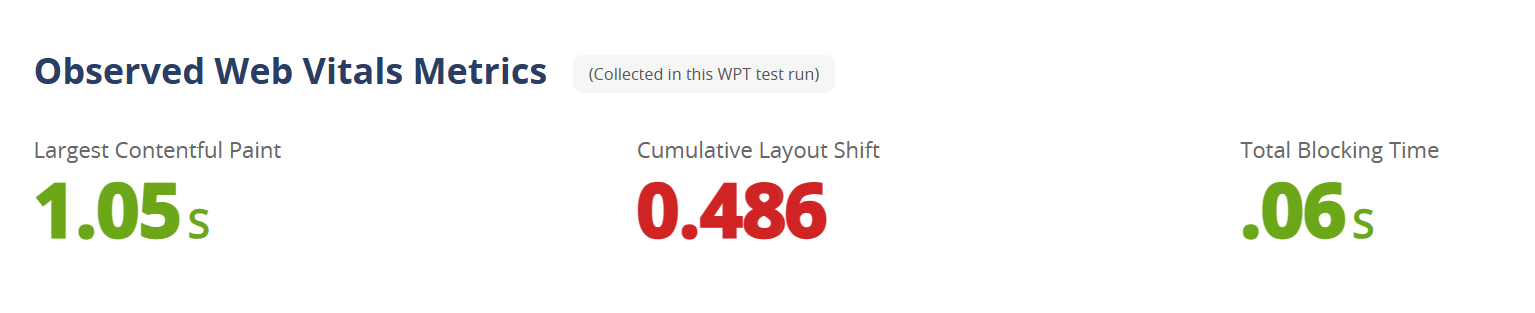
  • Under the CLS section, a visual reference on how the layout shift is getting triggered so you can identify the element and take necessary action to fix it.

In this example, the logo (image) had been loading a bit late, so when I decided to preload the image, that fixed the layout shift issue for the site.

You can also look at the asset flowchart to simulate where your assets are loading and which asset you want to load faster so all elements on your pages load stable.

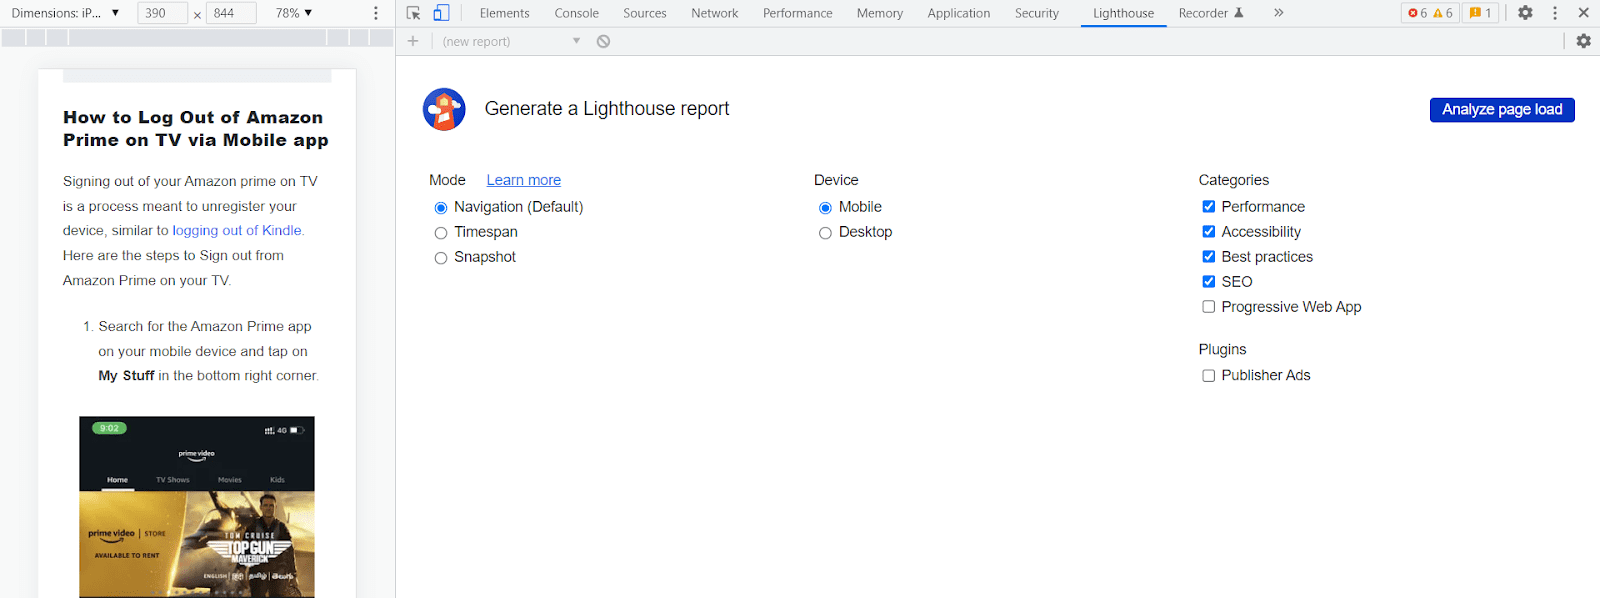
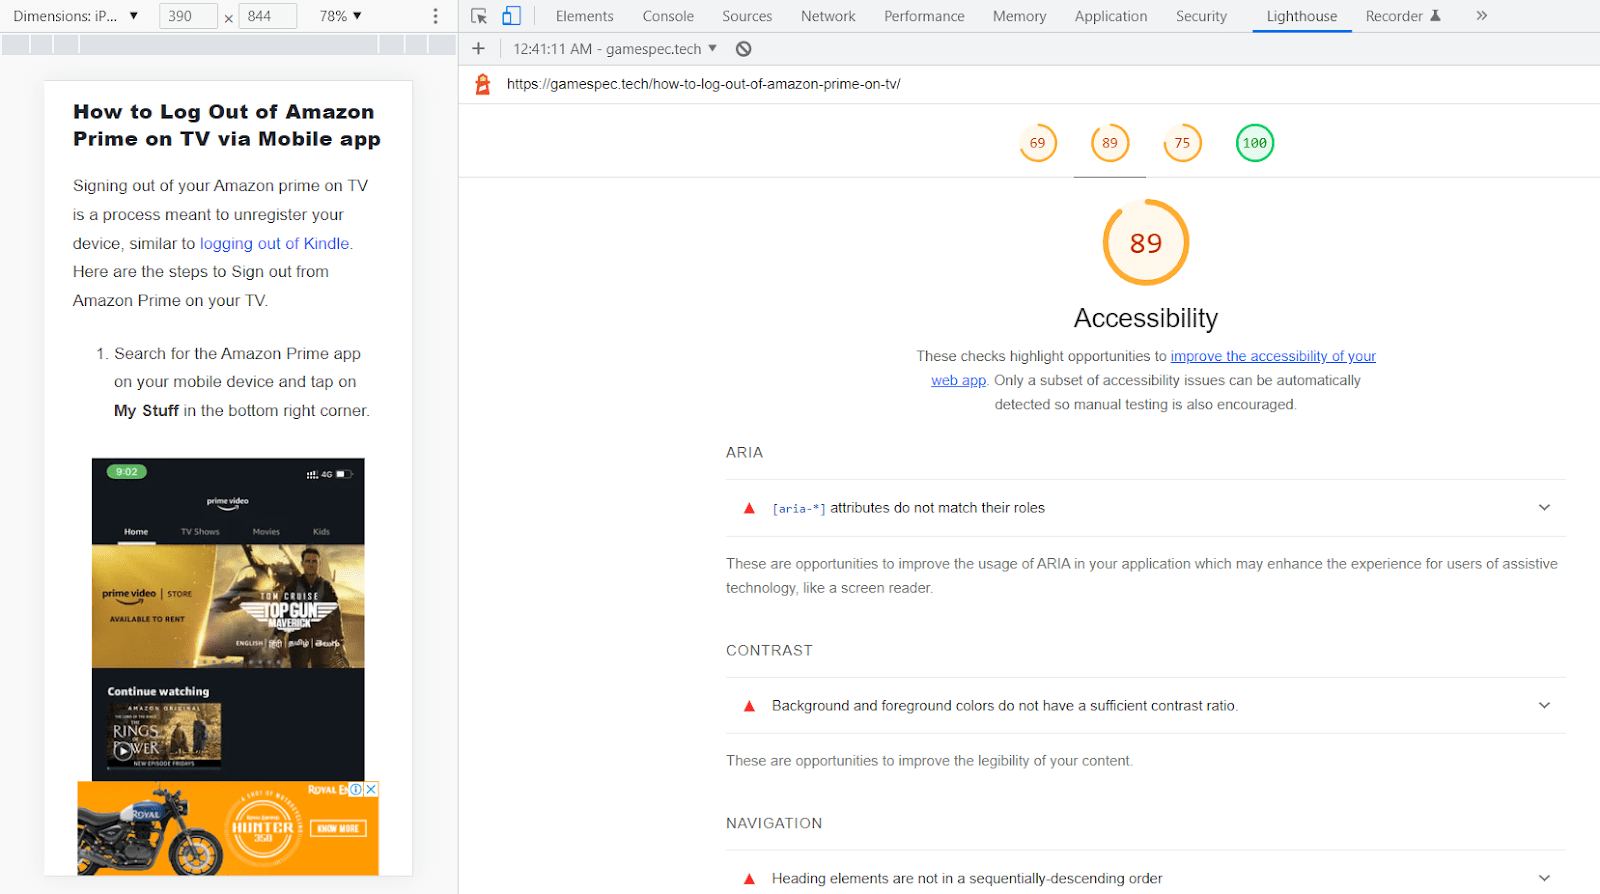
#2. Use Page Speed Insight To Detect Element Shiting

Page Speed Insight is Google’s go-to tool for testing web vital metrics on web pages. It’s a widely trusted tool for evaluating website performance.

While the CLS report it generates may not be as visually intuitive as that of WebPageTest, it still identifies the impacting element. Once you’ve identified the affected element, finding a solution becomes more straightforward, as you can closely observe the reasons behind its shifting.

To detect Layout Shift, visit PageSpeed Insight and enter the URL of the page you want to assess. Check the resulting metrics: A score higher than 0.25 is considered poor, and Google recommends improvements when the metric falls within the range of 0.1 to 0.25. However, the goal should always be to eliminate any type of layout shifts on your web page.

After generating the report, go to the DIAGNOSTICS section and expand the “Avoid Layout Shifts” section. Here, you will find a list of elements that contribute to your overall page layout shift. Each element will be displayed as HTML code, allowing you to identify the CLASS and element ID, which can help you locate it on your web page.

#3. You can use Webvitals.dev’s CLS debugger

The Cumulative Layout Shift (CLS) Debugger tool available on webvitals.dev is an excellent resource for visually identifying CLS issues on your web pages. Simply provide the URL, and the tool will conduct multiple tests across different browsers for both mobile and desktop versions of your site. It will identify elements with shifting problems and make it straightforward to address them by marking the affected elements and providing associated scores for resolution.

Steps to use this tool:

  • Visit: https://webvitals.dev/cls
  • Give your URL address > check the consent box and start the analysis.
  • You will see the debugger loading screen as long as the test runs.
  • Once the test is finished, you will notice the CLS visualization over your mobile and desktop versions like this, which I believe is a decent way to know where you need to fix element shifting.

There could be many reasons causing CLS issues on your pages, but here are the most prominent causes of CLS across most of the sites and solutions.

Top fixes for CLS issue: more than 0.25

  • Turn Off Sticky Headers: Avoid using sticky headers that cause content to shift as users scroll.
  • Eliminate Logo Zoom Effects: Disable logo zoom effects, such as zooming in or out as users scroll. Ensure your logo image includes size attributes. Lack of size attributes is a common cause of CLS issues.
  • Specify Width and Height for Elements: Declare explicit width and height attributes for elements like images. Avoid using pixel measurements (px). In platforms like WordPress, these attributes are often set automatically when you upload images. Here’s an example of properly declaring dimensions:
   <img src="thelink" width="400" height="300">

Note that you should use plain numbers, not pixel values.

  • Avoid Content Overlaps: Never insert content that can overlap existing content, except when triggered by user interactions. This ensures that any layout shifts are expected. Common examples include popups like subscription or newsletter forms.
  • Disable Animations or Use CSS Transforms: Consider disabling animations altogether, or use CSS transforms for animations that don’t trigger layout changes. Ensure that animated transitions maintain context and continuity between states, or consider avoiding animations altogether.
  • Exercise Caution with CSS Minification and Caching Plugins (WordPress): Be cautious when using CSS minification or caching plugins, especially in WordPress. If you’re using a caching plugin, consider disabling CSS minifiers or compilers first. Test by temporarily disabling the caching plugin to check if it’s causing CLS issues. Note that default settings in plugins like WP Rocket have been known to create CLS problems.
  • Ensure Instant Font Display: Ensure that fonts are displayed instantly, even before the font family fully loads. Use CSS code like ‘font-display: swap;’ in each ‘@font-face’ style to achieve this. If ‘font-display: swap;’ doesn’t work, consider using ‘font-display: optional;’. Here’s an example:
   @font-face {
     font-family: 'roboto';
     src: url("https://www.paulhoda.co.uk/roboto/Roboto-Regular.ttf");
     font-display: swap;
   }
  • Disable Floating Ads: If you have a floating ad that covers your content, it’s a simple fix: disable it. Move that advertisement to a location within your content so that it doesn’t obstruct the user’s view. Google introduced CLS penalties partly because floating ads can lead to unintentional clicks when users scroll through an article. Placing the ad within your content, similar to how you would add an image to your article, can help avoid this issue.

Conclusion:

Identifying and resolving CLS issues can be a challenging task, often involving hands-on coding and potentially editing server files or your WordPress theme directly.

If this seems too complex for you, consider enlisting the help of an expert to address your CLS problems and other core web vitals errors. I recommend reaching out to Speedy Site for professional assistance. Use my code SPEEDY50 to enjoy a $50 discount on your initial order.

Read More

White Labeling SEO: Unlocking the Power of E-commerce Optimization

In today’s hyper-competitive digital landscape, e-commerce businesses are constantly seeking ways to stand out and maximize their online visibility. One powerful strategy that has gained significant attention is white-labeling SEO.

Read More

How To Check SEO and Web Best Practice Compatibilities

We want our site to be flawless to avoid penalties or compatibility issues with search engines. Rectifying technical SEOs, Removing possible accessibility issues, and following best practices of web development are tiny details that can decide your site’s performance on search engines.

To secure these criteria, the basic step is to identify the issues on your page. While we usually lean towards great tools like Ahref and Semrush to scan for page-related issues, one quicker and more efficient way to do this is to perform lighthouse scans via your web browser.

Lighthouse, previously known as the “Audits tool,” is a tool to identify and fix common problems that affect your site’s performance, accessibility, and user experience.

These are the simple steps to run a lighthouse scan on pages across your site:

  • Open an incognito browser window and click on the three dots in the top right corner.
  • Open your website page where you want to carry out the test. 
  • From there, navigate to More tools > Developer tools.
incognito-mode
  • Next, select the lighthouse tab on your Dev toolbar. (click on the drop-down icon if Lighthouse is not listed among the visible tabs)
  • Under the “generate lighthouse report” section, set the Mode to “Navigation,” select your preferred device type for testing, and check Performance, Accessibility, Best practices, and SEO under Categories.
Lighthouse_test
  • Once done, click on Analyze page load (the test should take a couple of seconds based on your site speed and asset count)
  • When the test is complete, Lighthouse will rate your page per category and display technical faults, if there are any, similar to this example.
Lighthouse-scan-result
  • Lighthouse reports are great and let you find critical issues on your pages that you might have never thought existed. I encounter many silly mistakes on various page tests, and fixing those issues has been helpful to those sites (personal sites).
  • Moving forward, you can switch the available reports to find individual flows in each category. 

Once you know where the issue is, it becomes easier to resolve it yourself or hire someone to fix it. In addition, performing a lighthouse test takes just a couple of minutes, which can be an essential step towards improving your site to be more favorable to search engines. 

You will receive some recommendations on where to start, and getting these small details resolved will definitely boost the site’s overall impression for real users and search engines.

Similar articles:

  1. 5 Best Free Plagiarism Checker Tools You Can Try
  2. How to set up a WordPress multisite [step-by-step tutorial]
  3. Free Amazon Affiliate WordPress Plugins [2022 Update]
  4. Few Ways To Optimize Images Without Using Plugin 

Read More

5 Best WordPress Speed Optimization Services You Can Hire

Fast-loading web pages are more appealing to both users and search engines. Nowadays, readers like to experience fast web pages. So as a WordPress site owner, it becomes essential for you to work on your website performance.

The latest core web vital update from Google urges the websites to deliver an optimal browsing experience for the users. Site speed and web vitals are now official ranking factors in Google.

By improving your website loading speed, you will be able to improve the overall browsing experience on your site. Studies have always indicated that a fast page loading speed will result in a better conversion rate.

conversion-rate-page-load-time

Although caching plugins are quite useful to improve your WordPress site performance, you will still need to understand the reason behind those settings. Of course, there are documents and multiple guides available but you might still need some help at some point or it’s just that you don’t have enough time to put effort.

In addition, these WordPress performance tweaks play with your website code so can break your site’s functionalities and layout. If you are one of those who want to optimize your site as safely as possible and avoid any business-critical issues, you can consult speed optimization services.

This article takes a look at some of the best WordPress speed optimization services you can reach out to. There are various WordPress optimization services available; we are listing some of those according to our experience with them.

5 WordPress Speed Optimization Services You Can Try

1. Speedy Site

Speedy Site is a WordPress speed optimization service with a successful history of improving page loading speed with an average of 2.2 seconds. They help you fix your core web vital issues on WordPress sites. They claim to have a full refund policy if they can’t fix vital web issues. They are the service that fixed web vitals for 3 of my sites with Ezoic ads, so defiantly worth trying it.

Speedy Site service has a team of WordPress experts who works on the sites and take necessary actions to solve vital issues and minimize loading speed. Many reviews declared they were able to significantly improve load time and Page Speed Insight score for mobile and desktop devices.

The service has an effective technical support team who monitors your site performance and web vital status during the service period and communicates with customers’ queries 24*7. Apart from speed optimization service, Speedy Site offers budget-friendly heavy site overhaul and Google Page Experience optimization service.

Speedy Site Service Includes:

  • HTML, JS and CSS minification.
  • Optimize JS and CSS loading.
  • Image Compression & delivery optimization.
  • SSL Configuration
  • Youtube Video Optimization
  • Optimizing Render-Blocking Resources
  • Font Optimization
  • CDN Support
  • Remove query string & Gzip compression
  • Long-Term Support on Web Vitals

Service Pricing: Their speed optimization service has a single plan with a fee of $199 that includes all the features mentioned above. You can use our couponWINCOME50 to get a flat $50 discount (one-time use per user).

2. WP Buffs

WP buff is another well-known WordPress optimization service that offers a range of features across five plans to optimize your website performance and experience. They have WordPress experts responsible for minimizing your website load time and fixing performance-related issues.

People who have used their service love them, and there’s no doubt the WP Buffs team satisfies customers’ needs in a very effective & transparent way. They release WP Buffs case studies where you can go through the journey of customers with their service and how they help them get success with WordPress.

Apart from Speed Optimization, WP Buffs offers 24*7 website edits, Weekly updates, Ongoing security, Emergency 24*7 service, and website backup.

WP Buffs Speed Optimization Service includes:

  • Image Optimization.
  • Eliminate render-blocking issues.
  • minify javascript and CSS.
  • Leverage browser caching.
  • Gzip compression
  • Remove query string.
  • Review server response time.
  • CSS optimization.

Service Pricing: WP buffs offer five plans, as mentioned above, starting from $79 to $447 (when billed monthly) becomes $66 up to $373 when billed yearly. The speed optimization service is only included in the perform, custom, and custom pro plans that cost $219, $347, and $447, respectively.

3. Online Media Masters

Online media master is a go-to place when you need a speed optimization settings guide. This site has helped thousands of people get better scores on Lighthouse, GTmetrix, and PageSpeed Insights. When you need a thorough guide to configuring caching plugins on your site, Onlinemediamaster is the right place to visit.

They offer WordPress speed optimization service claiming it has helped many people by achieving 100% scores in nearly every speed testing tool. So if you are worried about your site’s performance score, this service is one of the places to reach out.

key features of Onlinemediamaster’s Speed Optimization Service:

  • Server optimization + hosting migration.
  • Caching plugin configuration
  • CDN (Cloudflare & BunnyCDN)
  • Image Optimization
  • Google Font Optimization.
  • Image & video lazyloading
  • Database Cleanup.
  • Bloat removal

Service Pricing:

Unlike Speedy Site and WP Buff, Onlinemediamasters does not offer commercial packages. They offer their service upon evaluating your WordPress site’s condition and work volume.

4. WP Johnny

WP Johnny’s speed optimization service must be among the top when you need speed optimization on your website. This service features custom packages from speed consultation to VIP speed upgrade. His service also offers page builder removal and Gutenberg conversion, and custom code service for the best performance.

You can even post your site on the WPjohnny Facebook group for free tips. The sheer amount of reviews from people who have benefited from this speed optimization service says a lot about its quality. His speed optimization service includes speed-up consultation, plugin audit, tweaking web host configurations, code audit, manual hard coding of the theme, and much more.

Key Features:

  • Speed consultation (speed-up strategy)
  • Cache plugin installation & configuration
  • Theme settings configuration
  • Speed-testing and diagnosis 
  • Plugin audit & Database optimization.
  • WooCommerce or WPML optimization.
  • Server optimization.
  • Extensive database clean-up.

Service Pricing:

WP Johnny speed optimization services cost around $195 for SPEED-UP CONSULTATION up to $1295 for ENTERPRISE SPEED-UP PACKAGE. You will also have Quick Speedup Package, Pro Speedup Package, and Premium Speedup Package in that price range.

5. Optimize WP

Optimize wp could be another service you can defiantly go for. They run several tests to gather an in-depth idea about your site’s current state. They have a record of happy reviews from people who hired their service to optimize WordPress sites.

You can speak with their expert request for a pre-performance audit and potential scope for optimization. Their speed optimization service ensures your site delivers compressed images in Webp format, Woocommerce is optimized for performance, server configuration for faster asset delivery, optimal CDN settings, and fast database performance.

Apart from WP speed optimization, they offer WordPress Maintenance Service and SEO service.

Key Features of Optimized WP service:

  • Image optimization.
  • eCommerce speed
  • Server optimization
  • Code minification
  • Cloudflare CDN
  • Google Analytics
  • Multi-level caching
  • Database optimization

Service Pricing:

Optimize WP offers three packages. BASIC ($399) is suitable for personal and small business sites, PRO ($799) is best for eCommerce and large blogs and ENTERPRISE ($1199) is claimed to be suitable for high-traffic websites which include SEO optimization services as well.

FAQs:

Should I Hire a WordPress Speed Optimization Service?

WordPress speed optimization services take all the burden of analyzing your website assets, overall auditing performance, ongoing issues, and server impact on speed, and then fix them with their skills, experience, and setting up website cache.

While speed optimization plugins make it easy to configure and automate many things for you, they can break your site design and functionalities. It does not mean the speed optimization plugins are poor, but if you want to squeeze out every bit of potential speed from the website, a speed optimization service is a perfect option.

When you have a small site with no page builders and lower assets, try creating a staging version and then experiment with caching plugins, including other optimization plugins, with seeing what performance you can get.

Additional articles:

  1. 5 Best Free Plagiarism Checker Tools You Can Try
  2. Top 10 Best Typography WordPress Themes
  3. Free Amazon Affiliate WordPress Plugins [2022 Update]

Read More

How to set up a WordPress multisite [step-by-step tutorial]

WordPress has been frequently updating its features over the years and on the 5.0 update, it is unconfined the multisite feature. WordPress multisite feature is extremely useful for content marketers, developers, and bloggers who manage multiple WordPress sites at a time. 

If we look closely it’s not only the bloggers who work on multiple WordPress sites, there are developers and organizations that use this system to manage dozens of clients at a time. Moreover, you can see some organizations allow registered individuals to publish blog posts while the owner or super admin can only make changes inside the WordPress admin dashboard. It is feasible to do so because of the multisite feature.

The purpose of this post is to explain when to use multisite and how to get it all configured. Stay tuned as we will go through the step-by-step procedure until we launch multiple sites under one WordPress admin dashboard.

Why Multisite? 

Before diving into the tutorial, let’s understand when you should decide to go for multisite over a single WordPress installation and when you should not! This is important because at some point you may think WordPress multisite would be a better option for your online business however, that is not always the case.

You would prefer to analyze the advantages and limitations of multisite in order to make the right decision during WordPress installation depending on your website standards and its possible requirements.

Pros of WordPress multisite: 

  • All in one dashboard. The super admin gets the control in one place of the entire WordPress site under that network.
  • Installation of themes and plugins on multiple sites takes only one go.
  • Updating becomes easier since it takes just one click to update the components of all WordPress installations under that multisite network.
  • Multisite allows creating unique dashboards for each site and site admin. 
  • Website backup is easy because you can store all site data in a single backup.
  • The use of server resources for multisite is less than individual WordPress installation and easy to optimize as well.

Cons of WordPress multisite: 

  • Not all plugins are supported by multisite. Since most of the plugins are designed to work on a single WordPress installation, installing them on multisite may raise the possibility of plugin conflict. 
  • Individual site admins can’t install plugins/themes which limits the power of administrators.
  • Traffic spikes can slow the website’s performance and may create trouble for the entire network.
  • Hacker or server downtime will affect all the sites under that network.
  • A data breach will involve all the individual WordPress sites.
  • Since all sites share the same user data identical user accounts can not be created for two different sites. 

How to Setup WordPress Multisite

Step 1: Preliminary requirements before setting up WordPress multisite 

Your first and foremost step would be getting a quality web host. It is possible to set up a smaller multisite network on shared hosting. However, we would recommend managed web hosting or a VPS for better server response and site performance.

The next thing you need to know is how to install a regular WordPress site and working experience with FTP clients would be better.

For WordPress multisite, another important step is to pick your domain or URL structure. You have the option to choose between subdomain and sub-directory.

Moreover, if you already have WordPress installed the pretty permalink should be activated. This means that the permalink structure of your WordPress should look like this: http://yoursite.com/sample-post rather than http://yoursite.com/?p=123.

Next, make sure all plugins are deactivated before initiating the multisite feature. This step is crucial because an activated plugin can create conflict with multisite since we know multisite does not support all WordPress plugins. So in order to make sure you do not face any issues during multisite configuration deactivating installed plugins is a safe choice.

Step 2. Activate WordPress Multisite Feature 

As we progress, the next task is activating the WordPress multisite feature. The multisite feature can be activated on a pre-installed WordPress or during a fresh WordPress installation.

Activating multisite on a pre-installed WordPress is a manual process, however, activating it on a fresh WordPress installation takes a single check on the ”enable multisite” option.  

Now let’s understand the manual way. The condition for this is to have a WordPress site already installed. And you would like to create a backup of your complete site. After creating the backup you need to access the wp-config file from your cPanel or by using any FTP client and open that file for editing.

In the wp-config file locate this line “/* That’s all, stop editing! Happy publishing. */

Now right before this line, you need to add the following: 

/* Multisite */
define( ‘WP_ALLOW_MULTISITE’, true );

Check out this example below:

Now save the file on your server and the multisite feature will start working on your WordPress.

On the other hand, if you are about to install a fresh copy of WordPress then you should check the “enable multisite” option. Once you check that option and your WordPress will be configured for the multisite feature. This option basically pre-configures the wp-config file so that you don’t have to do it manually. 

Step 3: Configure your WordPress network

Now since your multisite feature is enabled you need to set up an environment for the WordPress network. In order to do that log in to your WordPress dashboard and find network setup under tools in your left sidebar.

Once you get there, a message appears that says Apache’s mod_rewrite module must be installed in order for the multisite feature to work. If you have reliable hosting this module should have been enabled already.

Next, you will have to follow your decision whether you planned to use subdomains for your sites in the network (eg: site1.yoursite.com) or you wanted to use a subdirectory instead (eg: yoursite.com/site1).

Select your preferred domain structure and provide a network title which is your new WordPress site title followed by the network admin email address. Click on install to establish the first site in your WordPress network.

Step 4: Complete the network configuration 

In order to complete the network setup, you need to follow the guideline provided by WordPress. It will give you two snippets of codes that must be added to your wp-config file and .htaccess file respectively. These two files will be available in your root directory.

Note that it’s extremely important to back up both of these files before making changes. Otherwise, sometimes simple misplacement of the custom codes can break your site. 

After file backup adds the following code snippet to your wp-config file above the line “/* That’s all, stop editing! Happy publishing. */”. This code mentioned below should display on your WordPress network configuration dashboard as well. 

define('MULTISITE', true);
define('SUBDOMAIN_INSTALL', false);
define('DOMAIN_CURRENT_SITE', 'gamespec.tech');
define('PATH_CURRENT_SITE', '/');
define('SITE_ID_CURRENT_SITE', 1);
define('BLOG_ID_CURRENT_SITE', 1);

Once you have updated the wp-config file next, open the .htaccess file and replace other WordPress rules present there with the following code snippet.

RewriteEngine On
RewriteBase /
RewriteRule ^index\.php$ - [L]

# add a trailing slash to /wp-admin
RewriteRule ^([_0-9a-zA-Z-]+/)?wp-admin$ $1wp-admin/ [R=301,L]

RewriteCond %{REQUEST_FILENAME} -f [OR]
RewriteCond %{REQUEST_FILENAME} -d
RewriteRule ^ - [L]
RewriteRule ^([_0-9a-zA-Z-]+/)?(wp-(content|admin|includes).*) $2 [L]
RewriteRule ^([_0-9a-zA-Z-]+/)?(.*\.php)$ $2 [L]
RewriteRule . index.php [L]

After the modification, make sure to save the .htaccess file on the server.  

Step 5: Network Admin Menu And Network Settings

Once you have changed the wp-config and .htaccess file, log in to your WordPress dashboard. You should see the “network admin” and “my sites” options on your WordPress upper admin bar. Hover on my sites and the network admin menu will be displayed. 

Below the network admin, you will find the list of your sites in the network and their respective dashboard, posts, and comments. To enter the backend of these sites all you need to click on their names from the list.

The network admin menu consists of the following menu tabs,

Dashboard: The dashboard has a widget to create a new site or a new user to the network. You can also search for existing sites and users as well.

Sites: On this tab, you will find all your sites in the network. For each site, you will have options for edit, dashboard, and visit site. You can modify site settings, themes, and users under the edit option. Bulk action such as deleting sites, active, and deactivating can be done from this page. This list of your network seems similar to a page and post list on a regular WordPress admin panel.

Users: In the user tab you can assign administrators to your network. Each user added here will have the super admin rule which means they can control each site of the multisite network. You can edit admin details, add new ones, as well as remove admin from your network. If you want to assign users or admin to a particular site only then you need to add a user via the administration panel of the site.

Themes: This tab has the option of installing and uninstalling, activating, and deactivating themes for your whole WordPress multisite network.

Plugins: Just like themes in this tab, you will find the list of installed plugins for the network. You can easily add supported plugins to all the sites, delete a plugin, and activate, and deactivate them whenever necessary.

Settings: This is the admin area of the multisite network where you have the control to modify your network title, and administrator email address, allow users to register on the network, and allow a logged-in user to create a new site, etc. Moreover, you can design a custom welcome email for each newly signed user, create custom comments for the first page, or post edits performed by any user.

Custom file upload limitations can be adjusted along with the allowance of the file extension. You can set a default language for the network which would be the global language setting for all websites.

After these settings, your multisite network is pretty much ready for assigning new websites and configuring themes and plugins for them. Now let’s start by adding a new site to the network.

Step 6: Add a new website to the network 

Currently, at the initial stage, you have only one website running under the interface that doesn’t make any sense. A multisite is only necessary when you need to have at least two sites installed under the same network. 

There is no limitation on installing websites under a multisite network. You can always add another site to the list whenever needed. To add a new website follow the steps mentioned below.

  • Go to my sites > network admin > sites and click on add new.
  • For the site address (URL) enter the desired website address. According to the domain structure you have chosen the site address can be assigned. In this example, we have picked the subdirectory URL structure so we need to add the subdirectory after the primary domain. 
  • Along with the URL you need to add the site title that will appear in many places on your super admin dashboard such as under network admin and site list. The site title will appear in metadata such as page title or in the front end as well.
  • After the site title, you can set the site language against the global language setting of the network.
  • Next, choose an admin email address for the new site specifically. This email has to be unique from any other email address available in the network.
  • Click on the add site button to create your new site and have it on your site list. You can find the new site on My sites > Network admin > Sites.

Site contexts such as URL, homepage address, blog title, blog description, and many more can be modified in the setting tab of every site.

Step 7: Install Themes in Multisite

Once you have added sites to the network themes and plugins also need to be installed. We start by installing a theme for the sites. Remember that you need to install a theme only once and that theme will be applied to all the sites in that network.

  • First, go to My sites > Network admin > themes and click on the button add new.
  • Find and install a theme from the WordPress repository.
  • Next, click on network enable to globally activate the theme for all sites on the network.
  • You can manage all installed themes from My sites > Network Admin > Themes. Themes can be network-enabled or network disabled from the theme list.
  • A network-enabled theme means that the individual site owners can’t control these themes but these themes will be available for use on their websites.

Step 8: Install Plugins on WordPress multisite

Similar to themes in multisite, only super admins can install the plugins. Individual site administrators can only activate and deactivate the plugins for their websites. The site admin can activate and deactivate plugins only if the super admin enables the administration menu option.

To enable the administration menu go to Settings > Network settings and check the “enable administration menu” box for plugins. 

Now head towards My sites > Network admin > Plugins and click on add new button to add a plugin to the network. Find your plugin on the WordPress repository, install the plugin, and click on “network active”.

The plugins marked as “network active” will be applied globally to all the websites. The site owners can choose whether his site needs a plugin to remain active or not.

Wrapping up: 

Once you complete all these steps correctly the WordPress multisite is ready for regular use. You can now add more sites, themes, and plugins from the super admin dashboard. The procedures are the same as mentioned above.

The individual sites in the network can publish posts and pages like a typical WordPress site. It is possible to do a lot more with a multisite for example connecting it with Cloudflare. But that could be a whole new tutorial. Finally, we hope this guide is clear enough to help you set up your first WordPress multisite. 

You can also read:


Read More